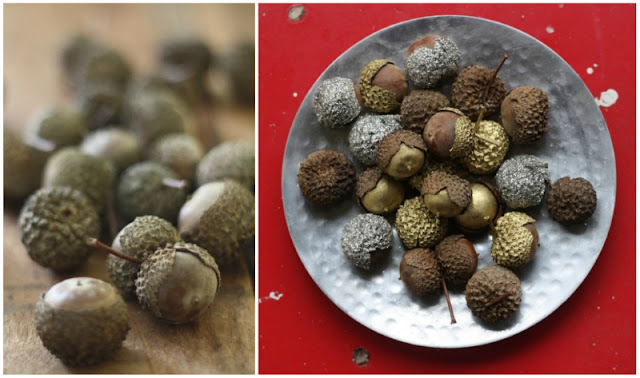
Looking for a quick and easy way to add a little holiday decor update to your home? I've got a project I just finished that's super simple, won't break the bank, can be used in all sorts of ways, and could be done with the kids — embellished acorns!


A couple weekends ago, Tim brought home a bag of acorns — I'd seen them beneath a tree in a random parking lot and made a comment on how I hadn't seen acorns like them before, thinking they'd be fun for some diy holiday decor ideas.

I was tickled that he'd grabbed a handful and after trying to look them up, I'm guessing they came from a post oak tree. Their shape is a little rounder, the tops cover more of the nut base, and they're a tad larger than the more classic varieties I'm used to seeing here around Richmond.

Here's what you'll need to make these embellished acorns:
- Acorns of your choosing, wiped down of dirt and debris.
- Spray adhesive, fine glitter of your choosing, and metallic spray paint of your choosing (any local craft store will carry these).
- Masking tape or painter's tape.
- Tweezers.
- Scissors.
- Newspapers or cardboard to protect your work surface and spray areas.
- Small bowl for holding glitter.
Tip: to really get the masking tape to protect the full areas, I used tweezers to push the tape into all the nooks and crannies.


Once the tape is in place, spray a portion of the acorns with metallic gold colored spray paint. For the remaining acorns, apply a fine glitter by first using spray adhesive, then rolling in a small bowl of glitter. Sprinkle additional glitter over any bare areas to fill them in — do this while holding the acorns over your glitter bowl to save any excess.
Tip: Use spray paint and adhesive outdoors to make sure everything is well ventilated. Also, follow spray directions for best application (mine took a couple thin coats).
Set acorns aside for at least 1 hour to completely dry. Once dry, the tape is ready to be peeled and your finished acorns will be revealed. On the glitter acorns, tap excess glitter off as you peel the tape over a a trash bin or your glitter bowl.
There's just something about that moment of the final reveal where you realize everything went according to plan — no matter how simple the project may be.


They're now ready for use and there are so many creative things you can do with them:
- They could be taken a step further and made into ornaments with the addition of a little striped baker's twine (holiday gift idea, anyone?).
- Use them as seating place markers, or make them into napkin rings by stringing a little baker's twine around the stem and wrapping around folded napkins.
- Wrap a little baker's twine around them (again) and affix them atop of holiday gifts as a cute and useful packaging topper.
- We're going the more basic route by using them as a decorative update simply scattered across our holiday spread in an organic fashion.
- They'd also look great grouped in a glass vessel or rustic bowl.
- I'm sure you can think of more ideas!
I love how they look natural and fancy at the same time without screaming holidays like so many decorations can tend to do. When you're ready for something different, store these little guys in a Ziploc bag for safe keeping and use them again for years to come!
What seasonal elements have you been using or plan to use in your holiday decor this year — have any old favorites?

Oh my goodness....I LOVE those! What a fantastic idea, Mary. I am definitely doing this with the kids!
ReplyDeleteThese are too cute!
ReplyDeleteThanks guys, this was a lot of fun. One of those projects that's fairly simple but provides a lot of satisfaction!
ReplyDelete@Monica - keep us posted if you try with the kids! Could work with pine cones too!
very very cute!!
ReplyDeletehttp://infinitelifefitness.com
http://mscomposure.blogspot.com
wow!!
ReplyDeleteLovely Idea
Thanks Nicole and everyone — these were a lot of fun to make!
Delete